
Last updated
17 January 2025
Overview
Surveys are a key tool for collecting customer feedback about their experience at your property. With the Instant feedback feature, you can create different types of surveys to gather opinions and insights in a structured way, allowing you to improve your services.
There are four types of surveys available:
- Welcome: Launched when the customer arrives at your property.
- Generic: An always-visible survey accessible at any time.
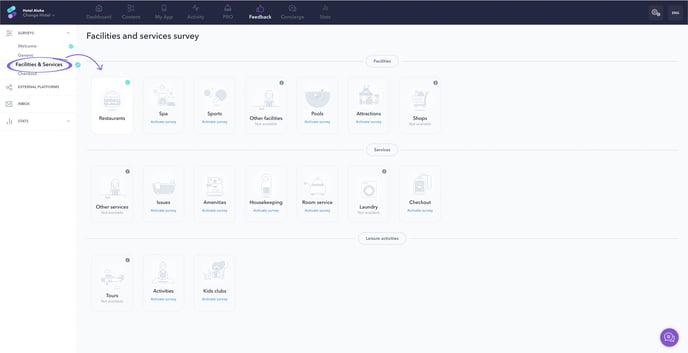
- Facilities & Services: Focused on a specific service or facility.
- Checkout: Triggered shortly before the customer’s departure.
Each survey type comes with a default template that you can use immediately or customize according to your needs. You can also personalize the final thank-you message shown to guests based on their survey score.
Before getting started
Before creating a survey, make sure you:
- Have a clear idea of the feedback you want to collect.
- Understand the survey type that best suits your goal (e.g., Welcome, Generic, Facilities & Services, or Checkout).
- Prepare translations for multilingual surveys if your property serves guests who speak different languages.
Step-by-step guide
Step 1: Define the survey questions
-
Go to Feedback > Surveys in the CMS.
-
Select the type of survey you want to create. The Questions tab will open.
-
Use the default template or edit, add, or delete questions to match your needs (maximum of 5 questions per survey).
-
Add a Title (survey name) and Subtitle (description).
-
Assign each question to the most relevant category to improve statistical reporting.
*For Facilities & Services surveys: You must first select the specific service or facility the survey will be about.
Important: Don’t forget to translate all text fields for multilingual users by clicking the flag icon in each field. You can enter translations manually or use the automatic translation option.
Step 2: Define the thank-you messages
- Scroll to the Thank-you messages section under the Questions tab.
- Add a personalized message that guests will see after completing the survey.
- Use the default message provided or customize it based on the score received in the survey.
Step 3: Choose settings for display, recipients, and comments
Under the Configuration tab, you can define:
-
Display options on the front page: Choose how and when the survey will appear (e.g., banner, pop-up, or full screen).
*For Generic surveys, display options are predefined and cannot be changed.
-
Recipients: Decide if the survey will be shown to all app users or only to those signed in. If you check the Show survey to all users option, you can decide whether sign-in will be required.
-
Comments: Allow guests to leave comments after each question or at the end of the survey.
-
Proactive mode (Facilities & Services surveys only): Make the survey always visible on the specific service’s screen.
Step 4: Select follow-up options
Under the Follow-up tab, you can:
- Set up email notifications:
- Enable notifications when a survey receives a specific score or lower. To do this, check the Send email if overall score is equal to or lower than box and choose from the drop-down menu from which score you want a notification to be sent.
- Enter staff email addresses to receive these notifications.
- Automate response status:
- Define how responses are marked based on the score received (e.g., mark as Solved if the score is 5 stars). The status will appear in the Inbox section.
Step 5: Activate the survey
-
Click the toggle button at the top-right corner of the survey screen. The button will turn green, and the survey will show as Activated.
-
Click Save changes.
Note: Active surveys will display a green checkmark in the left menu.
Extra tips
If you modify a survey (editing, adding, or deleting questions), you will be able to choose between two options to save it:
- Save as new survey: you will be generating a new version of the survey. Statistics will be calculated for this new version.
- Update current version: the existing survey will be overwritten with the applied changes. Statistics will include data from the update over the current version.
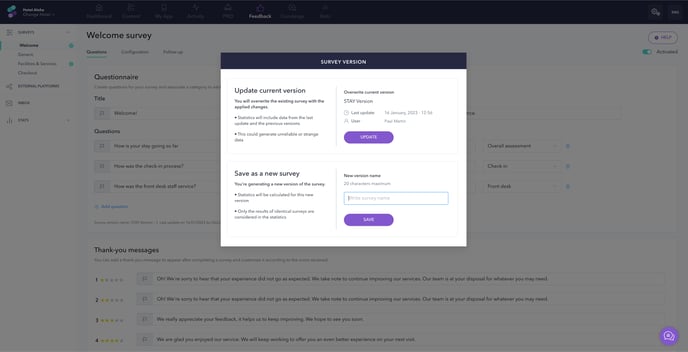
The name and date of the current version will appear at the bottom of the questionnaire. Please note that it is not possible to access multiple versions of the same survey (although data is saved for statistical purposes). You will only be able to use the version you last saved.
Next steps
After creating and activating your survey, you can start reviewing the responses in the Inbox section from the left-side menu. For more detailed guidance on managing survey responses, check out this guide.
Need further assistance?
If you have additional questions or require further assistance:
- Contact us via live chat
- Send a ticket to our Support team
- Visit STAY Academy