Last updated
17 January 2025
Overview
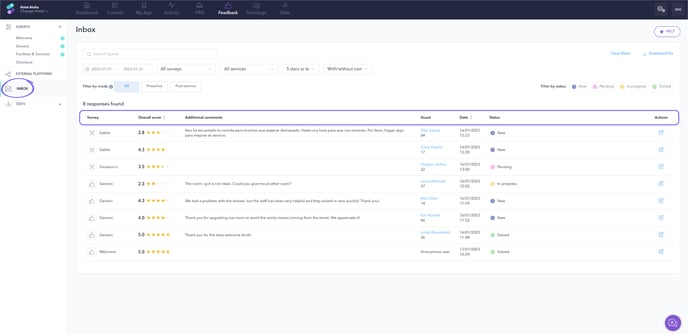
The Instant feedback feature allows you to manage survey responses effectively from the CMS. When a survey response is received, a notification will appear, and you can review all responses in the Inbox section under Feedback in the left-hand menu (CMS > Feedback > Inbox).
This tool helps you monitor guest feedback, track trends, and respond promptly to customer needs.
Before getting started
Before managing survey responses, ensure you:
- Have access to the CMS.
- Understand the different survey types (Welcome, Generic, Facilities & Services, or Checkout).
- Are familiar with the response statuses: New, Pending, In progress, and Solved.
Step-by-step guide
Step 1: Review the list of survey responses
- Navigate to Feedback > Inbox in the CMS.
- You will see a list of all survey responses organized into the following columns:
- Survey: Shows the type of survey completed (e.g., Welcome, Generic).
- Overall score: Displays the average score of all questions. Hover over the score to view detailed answers and comments.
- Additional comments: If the survey includes a comment field, this section displays guest feedback.
- Guest: Indicates whether the user has logged in or not. Hover over the guest’s name to see check-in/check-out dates, their average score, and last activity summary (not available for non-logged users).
- Date: Shows when the response was submitted.
- Status: Displays the current status of the response (New, Pending, In progress, or Solved).
- Actions: Click the pencil icon to view the full details of a response.

Step 2: View and manage response details
- Click the pencil icon in the Actions column to open the response details.
- Review the following tabs:
- Guest tab: Displays user details, including overall survey scores and stay information.
- Response tab: Provides a detailed breakdown of the user’s answers to each question (scores and comments).
- Manage the response:
- Update the status of the response by selecting an option (New, Pending, In progress, Solved) and clicking Save changes.
- Send a message to the guest by typing in the text box and clicking Send message.
- Create a request if the response identifies a guest need, forwarding it to property staff through the CMS request channel.
Step 3: Search and filter survey responses
- Use the Search guest box to look for a specific response by entering the guest’s name or “Non-logged user.”
- Apply filters to refine your search:
- Date range: View responses received within a specific period.
- Survey type: Select a specific survey or view all surveys.
- Services: Focus on specific services or facilities with surveys.
- Number of stars: Filter responses by score.
- Comments: Choose responses with comments, without comments, or both.
- Mode: Filter by proactive, post-service, or all responses.
- Status: Filter responses by their current status (e.g., New, Solved).
- Export your search results:
- Download a file in spreadsheet format (.xlsx) for further analysis.
- Use the Clear filters button to reset your search and apply new criteria.
Next steps
Once you’ve reviewed responses, consider setting up notifications or automating status updates in the CMS for a more efficient workflow. For more details, check out this guide.
Need further assistance?
If you have additional questions or require further assistance:
- Contact us via live chat
- Send a ticket to our Support team
- Visit STAY Academy