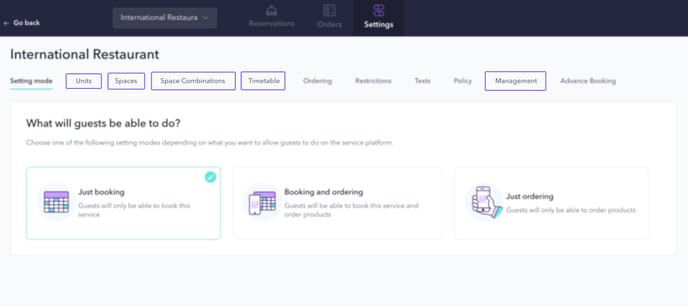
Once you have activated the PRO booking system, there are 5 steps to follow in order to start using this system:
- Create your inventory of units (Settings > Units)
- Create the spaces where you will set up the units (Settings > Spaces)
- Define the events or service shifts according to the spaces you need (Settings > Spaces combinations)
- Set an availability schedule for bookings or orders (Settings > Timetable)
- Give access to the management system to your staff (Settings > Management)

Step 1: create your inventory of units
A unit is a bookable item and also a place from which guests can place orders.
Examples of a unit can be a table at a restaurant, a lounger or an umbrella at a pool bar, a Balinese bed at a beach club, etc.
You can create as many units as you need. To do so, please follow these steps:
- Go to PRO > Settings > Units
- Click on Add new unit
- Choose a type of unit according to your needs and the type of service offered: round table, square table, Balinese bed…
- Write a name for it in the Unit box (maximum limit of 10 characters) and click on the flag icon if you want to translate it into other languages.
- Set the minimum and maximum number of people per unit in the Min Pax and Max Pax boxes.
- Type in the number of units you want to create with these same settings.
- Click Confirm when you are done.
If you want to create more units with other settings, click Add new unit again and follow the same steps.
Once created, they will be listed in this section and you can edit or delete them by clicking on the icons on the right.
A QR code will be generated for each that you can share with guests in case you accept orders. You can view them by clicking on View QR.
Step 2: create your spaces
A space is an area or facility where you set out the different units (e.g. tables) that are available for guests to book or order from.
You can arrange units as needed so that the space resembles the actual facility.
In order to create a space, you should have already created your units (Step 1).
Follow these instructions to create a space:
- Go to PRO > Settings > Spaces
- Click on Add space
- Add a name for your space in the Space name box (note that it may be visible to the customer)
- Drag the units to the floor plan on the right and arrange them as you wish
- Click on Save
If you want to edit a unit from the floor plan, click on it and 2 options will appear: Edit and Delete.
With the Add unit combinations button, you can decide what the system does if you receive a booking for more people than a single unit can accommodate. You can choose which units are combined together to accommodate these bookings. For example, you receive a booking for 10 people, and your units support a maximum of 4 people per unit. You can define that the system combines 3 units for a request like this. You can set a minimum and a maximum number of people for these combinations.
Step 3: define space combinations
Here you can define how to use the available spaces by organizing them according to the event or service shift you need to cover. You can merge several spaces for one event or use only one space for another.
For example, you can combine a dining room and a terrace for the daily breakfast, and then you have a lunch event in which you only use the main dining room. Or you can combine three different spaces to host a conference dinner.
To create a combination of spaces, follow these instructions:
- Go to PRO > Settings > Space combinations
- Click on Add space combination
- Add a name for the combination
- Select the spaces to merge in this combination
- Click Save
Create as many combinations as you need to cover the different shifts or events you have in your property.
Step 4: set an availability schedule
The next step is to define and assign an availability timetable to the combinations of spaces you have created. This timetable will indicate when guests can make reservations or place orders.
To do this, follow these instructions:
- Go to PRO > Settings > Timetable
- Click on Add timetable
- Choose the days of the week to which the same conditions will apply
- Define time slots according to your needs and allocate a combination of spaces
- You can define the time of use of each unit per booking in the Duration box
- Interval is the pacing by which booking times are offered to customers
- Quota is the number of spaces available for that time slot
If you want to make a time slot available to receive bookings, turn on the Enable bookings button. By activating this option, you can choose to Disable bookings from app in order to manage reservations internally without the customer being able to book through the app.
The Customize interval for this range option is also available, with which you can add quotas by interval and apply restrictions by customer segments. To do this, you should have previously defined customer segmentation (from the CMS home screen > Settings icon > Segmentation).
If you need to create another timetable for certain days of the week (e.g. weekends), click on Add timetable and select the specific options for those days.
Step 5: give access to your staff
The last step is to give access to your staff so that they can manage the bookings and orders you receive.
To do so, follow these instructions:
- Go to PRO > Settings > Management
- Type into the text box the email addresses of the people who will manage the bookings and orders of this service
By including an email address in this list, that staff member will receive a notification each time a booking or an order is received. You can add as many addresses as there are staff members.
*Additional step: activate timetables for orders
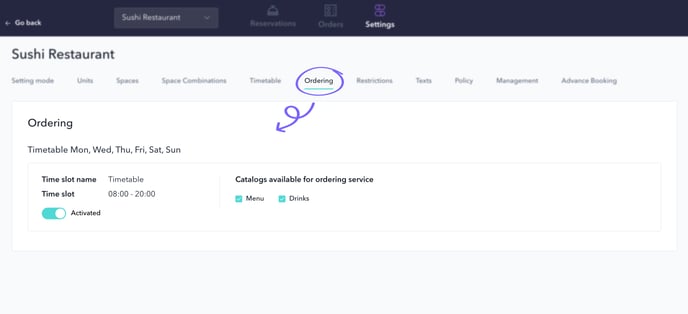
If you chose to accept orders, there is one more step: activate the availability timetables for orders and select a product menu.
To do so, please:
- Go to PRO > Settings > Orders
- Activate the time slots in which you accept orders
- Select the product catalogs that will be available for orders (you should have created a manual product catalog in Content > Facility / Service X > Edit > Catalog).
- Click Save changes

Once these basic configurations are done, you are ready to start receiving bookings or orders. If you would like to add restrictions, define the advance booking time, include a booking policy or further customize some options, refer to the following article: Optional configuration for the PRO booking system.
If you are ready to start receiving bookings and want to learn how to manage them, refer to this article: How to manage bookings with the PRO booking system.